


6 C's of Superficial Wound Management
a crash course to add to your Homestead Vet Cache, Issue 3

Welcome back friends! So happy to have you here.
Alright… thus far, we’ve gotten a jump on starting your Critter First Aid Kit with bandage materials, and have reviewed some conditions for evaluating which wounds are appropriate for home management, versus those wounds that necessitate veterinary intervention.
If you’re just joining us, here are links to those posts:

And now, we dig in to the nuts and bolts of managing wounds - the really fun stuff! These principles apply to all wounds, and are the same that I’d teach to a veterinary technician or a veterinary student.
For our purposes today, we’re talking about superficial wounds - the most common type you’re going to see around the homestead. These are often located on a limb, have bleeding that’s easily controlled with pressure or has already ceased by the time you get to it, and involve mainly skin or a thin layer of subcutaneous (just under the skin) fat and/or muscle tissue.
Ideally, a wound would be completely closed soon after it occurred, as there’s nothing better to cover a wound than the body’s own skin. But alas, we live in a fallen world and wounds are inherently less than ideal.
More often than not (a heck of a lot more often, actually), our animals’ wounds will not be tidy, little, clean incisions that are appropriate for sewing up right away. And even when they are, you - as the steward, and therefore the first responder - need to know how to care for those exposed, living tissues until you can get some veterinary help to suture it up.
Furthermore, there will be situations where bandaging is the only option available. Large wounds without sufficient, viable skin to close over the defect, deep punctures, contaminated wounds, and those where the skin has been pulled away from its underlying tissues, will need to be managed with bandaging while the body does the work of closing itself.
Goals of wound management
Apart from the obvious goals of healing, these are the boxes we want to be able to check when going through the process of managing a wound:
Minimize:
Stress
Pain (which contributes to stress and retards the healing progress)
Infection
Inappropriate inflammation
Motion of affected area
Bacterial resistance to antimicrobials (disinfectants and antibiotics)
Cost (when possible, without compromising animal care)
Maximize:
Tissue viability
Circulation to affected tissues
Nutrition
Return to normal function (if possible)
During each step of the process, we should be asking ourselves if our husbandry techniques are contributing to the accomplishment of these goals. If not, then we must adjust until they do.
{Links provided in this post are purely for your benefit & convenience. I’m not receiving any affiliate compensation.}
The 6 C’s of Superficial Wound Management:
Clip
Clean
Cover
Check
Change
Close
Thus far, the resources I’ve published here on Substack are free, and it’s my hope to keep them that way for those who need them.
However, reader support helps to afford me the ability to continue this work. So if you find value here & have the freedom to contribute, please consider upgrading to a paid subscription.
CLIP
Shaving the hair or fiber from around the wound will give you the visualization of the tissues that you’ll need to fully assess them.
*Remember the “tip of the iceberg” phenomenon: What you can see before clipping is always the tip of the iceberg, there’s often more hiding under the coat. So shave a wide enough area around the wound to make you confident that you’re not missing anything. This will give you the bonus of more space to apply your bandage.
Supplies:
Electric or battery-operated clippers with at least a #10 blade, #40 is better (a borrowed beard trimmer will work in a pinch…don’t tell my husband ;)
Sterile lubricant of some sort (vaseline works if it’s all you have). I keep several tubes of OB Lube on hand at all times. It’s cheap. You, the animal you’re saving from razor burn, and your overworked clippers will be grateful for it when you’ve got blood-crusted hair/fiber to shave through.
Steps:
With the animal safely restrained, liberally apply the sterile lubricant directly onto the wound and any blood-soiled hair/fiber around the wound that must be shaved. Yes, get it into the open wound, and spread around until you have a thick layer across all exposed tissue. Don’t skimp. This step helps to protect the sensitive tissues from hair and debris sticking to it as you shave, and give your clippers a slick medium to slide through as you clip the surrounding area.
If you have no sterile lubricant, at minimum place a small, moistened rag over the wound until done clipping in order to minimize clipped hair sticking to the tissues.
Start by shaving hair with the grain, which will help you avoid catching the edges of unseen wounds that may be hiding under the hair. Once you have all wounds identified, switch to clipping against the grain. Work slowly and methodically, and take care that your clippers are staying cool & aren’t leaving razor burn in their wake. Long wool/fiber can be shorn first with hand shears to expose wounds, then followed by clippers against the skin.
Give yourself a wide berth around the wound, large enough to convince yourself that it doesn’t have any friends hiding near by. Also shave with the intent of applying a bandage. Bandages are more apt to stay put when they’re not expected to stick to long hair or wool.
CLEAN
Supplies:
0.9% saline solution
Wound disinfectant - options include:
Chlorhexidine or Betadine - these must be properly diluted according to label instructions prior to applying to tissues
Herbal disinfectants - yarrow, calendula, hops, and chamomile. Dried herbs may be brewed as a tea, the herbs filtered out through a fine mesh or cheesecloth, then the “tea” used topically on the wound for cleaning.
**Leave the hydrogen peroxide in the house. Hydrogen peroxide is an indiscriminate oxidizer, meaning it will oxidize (=damage) all cells, including vital tissue cells, which is completely counterproductive to our goal of maintaining tissue viability. Don’t be intoxicated by its bubbling & fizzing. It has its place, but that place is not in a wound.
4” x 4” gauze squares, or clean, lint-free washcloths/rags
*Optional, but recommended
Steps:
Begin with 2-3 new gauze squares, soaked in disinfectant, wiping the wound in a circular or semicircular motion from the center of the wound outward, creating an invisible spiral as you go. Continue to the shaved area around the wound, so you’re creating a disinfected “field.” Never moving inward, always working outward with your spiral. Pitch your used gauze.
After your first spiral wipe with gauze, lavage with saline. A 60cc syringe and 18G needle are ideal for flushing a wound with saline. Push the saline through the needle at a fast enough rate to make a steady stream & splash your helpers (they love that). Rinse until you’ve covered the whole wound. (If you don’t have a syringe & needle, do your best to pour saline onto the wound sufficiently to wash away debris and remaining disinfectant).
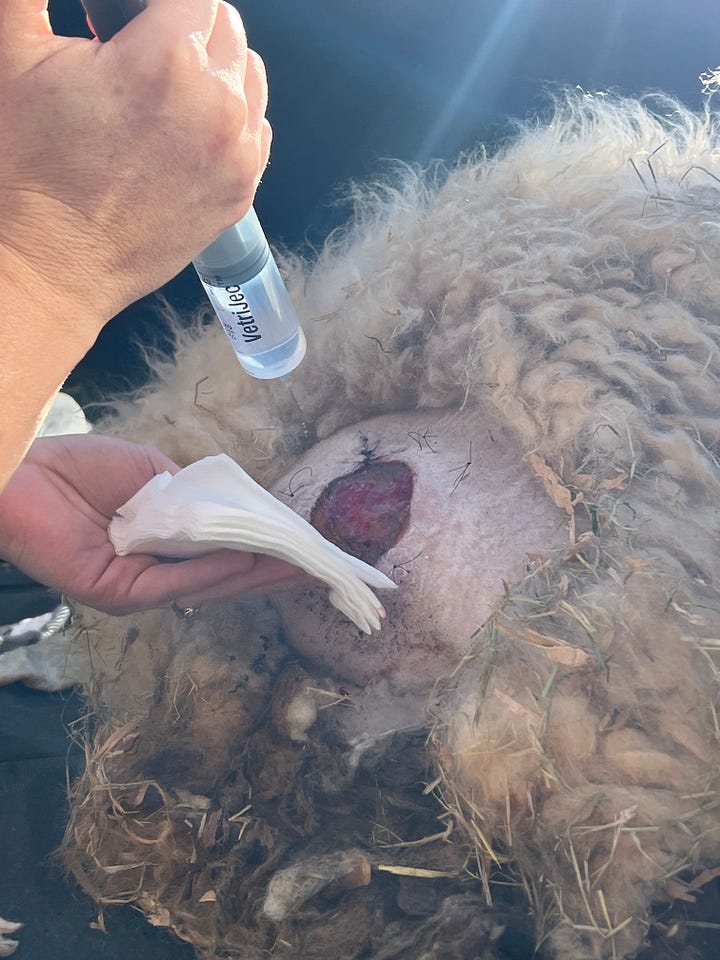
Saline lavage during bandage change on a ewe. Repeat steps 1 and 2, alternating wiping and flushing the wound, as many times as necessary - until visible foreign debris has been removed and your gauze starts to come back clean.
Dry the skin around the wound, but not the wound itself. Leave what saline remains to keep the tissue moist.


*Remember: always start in the center and work your way outward (work from clean to dirty, open flesh to skin).
COVER
One of the most basic principles of life: all living things need a covering. Whether it be a tree or soil, a wound or a soul, coverings must be provided to maintain life.
“With what shall I cover it? Dear Liza, dear Liza…” sounds like the title to an entire post, or even an e-course. This topic is broader than you may think. And there are oh so many opinions about how to dress a wound, which topicals to use, amazing magic miraculous powders, this, that, and the other thing.
I’m no exception. I have my favorites, and track records for justifying their use. But that discussion will have to wait to be fleshed out in another post…or e-course?
For today’s intents and purposes, let’s just get the wound covered. Dried out muscle, fat, capillaries, connective tissues, and skin edges are unhappy, and quite unwilling to heal…because they’re, well, dead. Covering the exposed tissue helps maintain moisture, protect it from further damage, and thus, promote a better healing environment.
Supplies:
Topical wound dressings…to name a few:
Raw honey or Manuka honey - Raw honey, whose source I’m confident was clean & pure, is my go-to for most wounds. Manuka honey is usually labeled with a UMF number of +5 or higher - the greater the UMF number, the greater the antimicrobial “power” of the honey. However, in my hands, I have not personally appreciated a difference in the healing rate of wounds treated with Manuka honey versus raw, local (not imported from New Zealand) honey. Take it for what it’s worth.
Photo by javier kober on Unsplash Honey’s benefits as a wound dressing check a lot of boxes. It’s antimicrobial, promotes new tissue growth, helps minimize need for systemic antibiotics, doesn’t contribute to bacterial resistance, and is relatively cheap-considering the small amount needed as a wound dressing.
Honey burns when first applied, so be prepared for a bit of a reaction. I can tell you from personal experience, the honey sting lasts for about a minute, then subsides.
Silver sulfadiazine - aka SSD. I like SSD for burns, but it also works well as a topical for other wounds. It is antimicrobial and is soothing to the tissues.
Sterile lube - yep, the same stuff we dumped in the wound before we shaved it. If you don’t have another good option, sterile lube will at least keep the wound moist and help prevent the bandage from sticking to the raw tissues.
Herbal poultices and salves - Many formulations are great options for wound dressings, but the making of which are beyond the scope of today’s post. Comfrey, hops, calendula, yarrow, and plantain are just a few of the components you may consider for these applications.
Commercial antibiotic dressings - I personally don’t start with antibiotics, unless the wound demands it. Judicious use of antibiotic therapy is more important now than ever. So in an otherwise healthy animal, without evidence of overt infection, I will hold off on any use of antibiotics (topical or systemic) until the animal proves to me that their immune system can’t mount an appropriate defense without them. If you ever need help determining if infection is present, consult your veterinarian.
Bandage materials - Basic bandage materials, as recommended for your Homestead Vet Cache, are outlined here. Take a quick peek to review our materials, then meet me back here!

Steps:
If the bandage is at risk for slipping down the limb, before you bandage the wound, tear a piece of white porous tape that’s about twice the length you anticipate your bandage to be. Apply it to the opposite side of the limb, allowing the extra length to hang until you use it in a few steps. This will create a stirrup, which will aid in keeping the bandage up.
Keepin’ it real folks - just bandaging on the living room floor! Placement of a tape “stirrup” along the back side of the limb, prior to starting the bandage. Apply a thin layer of wound dressing to a piece of 4” x 4” gauze, then apply the gauze to the wound.
*Do not apply Telfa (aka non-adherent bandage) as a first line to a new wound. Non-adherent bandages do a poor job of wicking away excess fluid from the wound, and will foster a happy environment for bacteria in a contaminated wound. We will use non-adherent bandages once the tissue has regained a good blood supply and has created granulation tissue, an important part of wound healing that we’ll cover later.
Wrap the limb in 3 layers:
#1- Roll cotton (or cast padding): This provides an absorbing layer for fluid the wound will produce, as well as added comfort. Starting a couple inches below the wound (closer to the foot), roll the cotton around the limb, overlapping by 50% with each wrap as you work upward (closer to the body). Stop an inch or two above the wound.
#2 - Roll gauze: This gauze holds the cotton in place and sures up the structure of the bandage. Repeat the same procedure as with roll cotton, covering the underlying layer. Take care to only apply about as snug as a tube sock, no tighter.
*If you’ve made a tape stirrup, before applying the 3rd layer, pull the free end of the tape up, turn it 180 degrees, and stick it to the roll gauze layer, effectively creating a stirrup.
#3 - Vet Wrap: This layer sticks to everything and secures the outside of the bandage. Apply as above, taking special caution to not apply too tightly, as you run the risk of occluding proper blood drainage from the leg. Unwrapping Vet Wrap from its roll, then re-rolling it by hand before applying can help prevent applying too tightly.
*Remember: Snug like a sock, no tighter.
(#1) Roll cotton/cast padding, (#2) Roll gauze, (#3) Vet wrap
Elastic Tape - One wrap of this at either end of the bandage, with 50% of the width sticking to the bandage and 50% sticking the the animal, will help keep the bandage up. As with everything, apply with a gentle hand & don’t make it overly snug.
Loose application of elastic tape to top of bandage.


Woo hoo! You made it through the fun part, and your bandage is on. The last 3 C’s are not so detailed, but are still darn important.
CHECK
You check the bandage
Especially if you’re new to bandaging, the more often you check your bandage, the more you will learn. Check it every few hours if you’re not super confident in your skills or the tightness of your application.
When you check the bandage, look for swelling of the limb or digits south (toward the foot) of the bandage. If swollen, the bandage is too snug and should be re-applied. Look for slippage and correct as needed.
Look for strike through (fluid or blood soaking through the outer layers) or soiling of the material, and change the bandage if you see it. A wet bandage invites bacteria to throw a party.
Vet check
If ever in doubt, check in with your veterinarian for guidance. If the wound falls into one of those categories that make it suboptimal to treat at home, apply your bandage as first aid, then get your vet’s eyeballs on it.
If the wound just seems to stop improving, your vet can help you evaluate the situation and make a plan to fit your animal’s unique case. Sometimes some level of surgical closure is still needed when wounds become stubborn and resist closing on their own.
CHANGE
Even a crappy covering that’s changed often will do more good for a wound than a good covering left on too long.
In many situations, daily bandage changes are necessary, especially early in the wound healing process. Those early days are where the wound is kicking out debris, producing a lot of fluid, and dealing with all the little beasties that stuck to the tissues when the injury occurred. It’s vitally important to remove the bandage daily during that phase, to monitor for infection, to re-clean the wound as necessary, and apply fresh bandage material.

The style of bandage and frequency of changes necessary for a wound can change, based on the stage of wound healing. We’ll take a look at those stages later. As always, consult your veterinarian if you have questions.
CLOSE
There’s a reason this “C” is last. Contaminated wounds should not be closed with primary closure (suturing closed as a first line repair) - new vet school grads, I’m talking to you, too. Resist the urge to close wounds too early!
The knee jerk to any open wound is “Shut that thang! Close it! Get it shut, now!”
But I repeat, resist sewing that thing shut before it’s had at least a few days to decontaminate and debride itself. The body is phenomenally capable of kicking undesirable things out of itself, and if you close a contaminated wound, you’ve just eliminated its ability to do so, creating a perfect environment for abscess formation and further tissue death.
The debridement phase of a wound is usually complete around day 5, and at that point you’ll also have a good idea of what tissues want to live, and which ones will die. Often times, flaps of skin will lose blood supply, but they’ll fake you out and pretend to be alive for those first few days. This is where a premature surgery goes south.

Around day 5, that skin turns black and fully declares its giving up of the ghost. If that happens along a suture line, the wound will dehisce (re-open), and you have another open wound on your hands. Thus, even if a wound warrants surgical closure, waiting until a questionable wound is finished debriding (cleaning itself and declaring dead vs. alive tissue) is a wise husbandry decision.
And there we have it, the 6 C’s of Superficial Wound Management:
Clip - Clean - Cover - Check - Change - Close
Good on ya’ for making it through this crash course!
Because no two wounds are the same, there’s an art to wound management, an art that takes lots of experience with lots of wounds to hone.
Wounds are dynamic. What a wound needs today will be different from what it needs in 5 days, 10 days. We have to listen to the animal’s body, consider the whole animal’s needs, and take cues from the tissues themselves to know which step is next.
It’s fascinating. And humbling. Because despite all our interventions, we don’t really do the healing. We do our best to provide optimal conditions for healing, but it’s not us that does the fixing.
God has designed living tissues to operate with mechanisms we won’t fully understand this side of glory.
While wounds are undesirable, I encourage you to take them on. Look at them as a window to the inner workings of His creation, and marvel at what He’s designed to function without our help, beyond our comprehension.
It’s beautiful. Geek out on it.
Show your kids. Teach them what you know. Point to God, and say, “Look what He’s done! Look what He’s doing!”
I can’t help but see the reflection of my own, injured soul…and thank Him…for covering her wounds with His own blood. It makes all of this sacred. It’s all His. It’s all His doing. Blessed are we when we see the work of His hands.
Soli Deo Gloria.

Printing this out and committing to memory.... thanks!!! (Guessing it’s good practice for humans, too?)